This page contains informations about how to use a certificate or your electronic identity card (eID card) for making digital signatures.
If you are using an eID card, make sure that your eID card is correctly installed and configured on your machine (compliant operating system, card reader and eID middleware installed, browser correctly configured). Informations about how to install, configure and use your electronic identity card are available on the following sites :
- Web site of the Federal Public Service over the eID card : http://eid.belgium.be.
- Web site of Zetes about how to install, configure and use your eID card : http://readers.eid.belgium.be.
This page is split into the following sections :
- Technical requirements
- Getting a digital certificate
- Setup for Internet Explorer
- Setup for Mozilla browsers
- Troubleshooting
1. Technical requirements
Creating a digital signature has additionnal requirements over digital authentication. For instance, it requires up-to-date browsers and libraries for encrypting data. The components required for making digital signatures are the following :
- Internet Explorer >= 5.5 or Mozilla Firefox >= 1.5 (other browsers may work but are not officially supported).
- A digital signature certificate (an eID card contains one).
- For Internet Explorer :
- The CAPICOM library (should be automatically installed, see section 3).
- For Firefox (and other Mozilla-based browsers) :
- Java Runtime Environment version >= 1.4.2. It can be downloaded from java.sun.com.
- The JSS library (must be manually installed, see section 4) for instructions about how to install it.
2. Getting a digital certificate
A certificate is needed to sign data, or to authenticate yourself with the system. Such a certificate is included in your belgium electronic identity card. If you do not have an eID card, you can get one from a Certificate Authority such as Global Sign. For detailed instructions about how to acquire a certificate, please follow the instructions given by aforementioned providers.
3. Setup for Internet Explorer
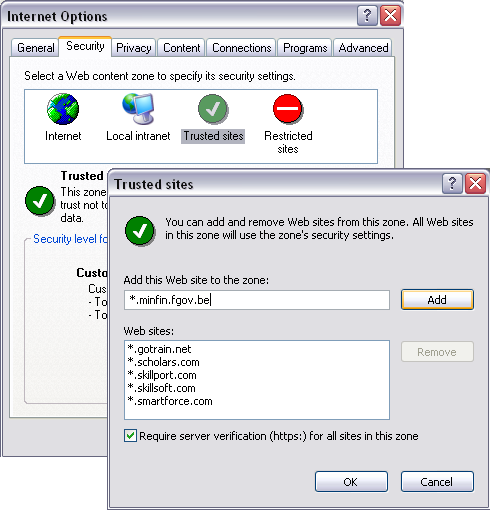
In order to avoid problems, we heavily recommend that you put the Web site of the Ministry of Finances in the list of trusted sites :
- Go in menu "Tools > Internet Options...", tab "Security"
- Click on "Trusted Sites", button "Sites..."
- Type in the text box "*.minfin.fgov.be", and click on "Add" to add the site to the list of trusted sites. See screenshot below.
- Click on "OK", and next on "Ok".
If you do that, you can jump directly to section 3.2.
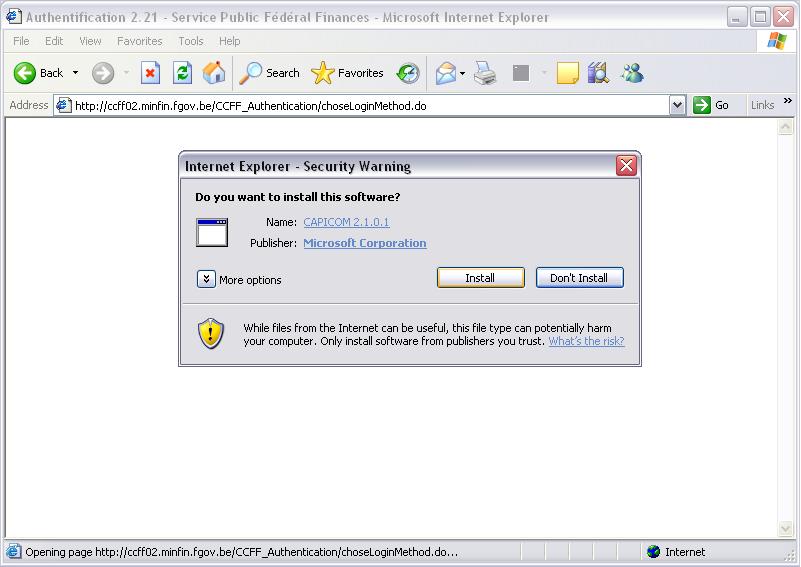
3.1. Installation of the CAPICOM library
This library is used to digitally sign data, verify digital signatures, envelop data for privacy, hash data, encrypt/decrypt data and more. If this library is not present on your computer, it is automatically installed, when possible. Depending on your configured security level, you may have to perform the following steps :
Low security level configured, or site minfin.fgov.be belonging to trusted sites
With such configuration, the CAPICOM library is automatically installed. You can jump to section 3.2. To see how to add the site of the Ministry of Finances to the list of trusted sites, see here.
Medium security level configured, site minfin.fgov.be not belonging to trusted sites
With this configuration, Internet explorer will first ask you if ActiveX controls can be actived. Click on the bar located on the top of the screen, and click on "Install ActiveX Control...".

Internet Explorer will next ask you the authorization to install the CAPICOM library. You can safely install this component. Click on "Install".
Highest security level configured, or manual installation of CAPICOM
If you need to manually install the CAPICOM library, a version for Internet Explorer 6.0 SP1 and above can be manually downloaded and installed from the Microsoft web site.
A copy of the CAPICOM library is also locally available here. You can download this file, unpack and copy the capicom.dll file into your Windows system directory (usually C:\Windows\System32). Next, restart your browser.
3.2. Installing a digital certificate into Internet Explorer
The digital certificate need to be registered into your browser(s). If you use an eID card and have the eID middleware installed, your certificates are automatically installed the first time you insert your card in the reader. For a software digital certificate, many certificate providers give a tool to register it automatically. When the certificate is only provided as a file, the following steps are needed for loading it in your browser.
- In Internet Explorer : go to "Menu Tools" > "Internet Options..."
- Click on tab "Content", next on button "Certificates...". A list appears with all your installed certificates.
- Click on "Import...". This opens a wizard. Click on "Next".
- On the dialog box that appears, enter the complete path to your certificate file, and click on "Next".
- Enter the password you received from the certificate authority. You can also mark the private key as exportable. Click on "Next".
- Choose "Automatically select the certificate store..." and click on "Next".
- You will received a message indicating whether the import was successful or not. Click on "Finish".
- The newly imported certificate should now appear in the tab "Personal" of the "Certificates" dialog box. You can check the validity of the certificate by double-clicking on it. You should see the mention "You have a private key that corresponds to this certificate".
3.3. Configuring Internet Explorer
Some options must be activated to allow you to make a digital signature:
- Go to menu Tools" > "Internet Options...".
- Click on tab "Security", "Custom Level".
- Make sure that "Microsoft VM > Disable Java" is NOT checked.
- Check that "Scripting > Active scripting" is set to Enabled.
- Check that "Scripting > Scripting of Java applets" is set to Enabled.
- Check that "ActiveX controls and plug-ins > Download signed ActiveX controls" is set to Prompt or Enabled.
- Check that "ActiveX controls and plug-ins > Run ActiveX controls and plug-ins" is set to Enable.
- Check that "ActiveX controls and plug-ins > Script ActiveX controls marked safe for scripting" is set to Enable.
- Click on "OK", and "Apply".
4. Setup for Mozilla browsers
For Mozilla browsers (Firefox, Mozilla, Netscape and others), the JSS library (Mozilla Network Security Services for Java) is required. This library allows Mozilla Browsers to perform cryptographic operations. It must be manually installed. It can be freely downloaded from http://www.mozilla.org/projects/security/pki/jss/using_jss.html.
4.1. Installation of Java Runtime Environment
Instructions for setting up Java for Mozilla Firefox can be found here.
4.2. Installation of JSS for Windows
For your convenience, an archive suitable for Windows platforms can be downloaded here. This archive contains the following files :
- jss33.jar : JSS Java archive
- jss3.dll : JSS shared native library
- libnspr4.dll : NSPR OS abstraction layer
- libplc4.dll : NSPR standard C library replacement functions
- libplds4.dll : NSPR data structure types
All these files can be freely downloaded from http://www.mozilla.org/projects/security/pki/jss/using_jss.html. They are distributed under the Mozilla Firefox End-User Software License Agreement, which can be found here.
To install JSS :
- Unpack the archive
- Copy the dll files (jss3.dll, libnspr4.dll, libplc4.dll and libplds4.dll) into your Mozilla installation directory (e.g. C:\Program Files\Mozilla Firefox\). You may need to overwrite the existing dll files for Netscape browsers.
- Copy the jar file (jss33.jar) into the lib\ext\ directory of all your installed Java Runtime Environments. These are typically located under C:\Program Files\Java\. For instance, you may have to copy jss33.jar into C:\Program Files\Java\jre1.5.0_06\lib\ext\ and C:\Program Files\Java\jdk1.4.2_07\jre\lib\ext\. The actual location may vary.
- Restart your Mozilla Browser.
A FAQ is available here.
4.3. Installation of JSS for Linux
For your convenience, an archive suitable for Linux platforms can be downloaded here. This archive contains the following files :
- jss33.jar : JSS Java archive
- libjss3.so : JSS shared native library
To install JSS :
- Unpack the archive
- Copy the libjss3.so into your Mozilla installation directory (e.g. ~/firefox or /usr/lib/mozilla-firefox).
- Copy the jar file (jss33.jar) into the lib\ext\ directory of all your installed Java Runtime Environments.
- Restart your Mozilla Browser.
4.4. Installing a digital certificate into Mozilla Firefox
When the certificate is provided as a file, the following steps are needed for loading it in your Mozilla Firefox. The certificate must be in the PKCS12 format. If it is not, the certificate can still be imported and exported into this format using Internet Explorer, or by using openssl.
- Go in menu "Tools > Options... > Advanced" (Or "Edit > Preferences > Advanced" in old versions).
- Click on tab "Security", "Show certificates", and next on "Import".
- Select the file containing your certificate, and click on "Open".
- Depending on your configuration, you will be asked to enter the password for accessing your keystore.
- Next, enter the password you received from the certificate authority, and click on OK.
- Your certificate should now appear in the tab "Your certificates".
4.5. Configuring Mozilla Firefox
Some options must be activated to allow you to make a digital signature :
- Go in menu "Tools > Options... > Web Features" (Or "Edit > Preferences > Web Features" in old versions).
- Make sure "Enable Javascript" and "Enable Java" opions are both checked. Check also that your browser does not block popup windows coming from our web site.
- Make sure "Enable Javascript" and "Enable Java" opions are both checked.
4.6. Activate the Belgium eID middleware in Mozilla Firefox
The first time it is used, the "Belgium Identity Card PKCS#11" module must be registered in Mozilla, Netscape or Firefox. This module can be registered automatically by opening a special html page located on your hard drive, usually at the following location : file://C:/Program Files/Belgium Identity Card/beid-pkcs11-register.html (Note that the location of this file may vary, according to your platform or installation options.)
5. Troubleshooting
Error 101 : No data to sign
There is no data to sign. This problem usually appears if you used the "back" button or if some error occurred in the application. In such situations, it may happen that the application "loses" the document that you wanted to sign. You probably need to go a few steps backward, and restart the signature processus.
Error 201 : Internal error. Applet not correctly loaded (Mozilla only)
The Java applet that handles the digital signature is not properly loaded. Check that Java is correctly installed on your machine. You might also have to clear the cache of your browser (Tools > Clear Private Data...) and of Java (open the Java Control Panel, General Tab > Delete files... > Ok). Next, restart the browser. If that does not help, contact the service desk.
Error 202 : Applet not correctly loaded. Java disabled or unavailable, or bad applet (Mozilla only)
See Error 201
Error 203 : Error while loading applet (Mozilla only)
See Error 201
Error 204 : Warning: version of JRE x.x is not supported (Mozilla only)
Upgrade your Java Runtime Environment to a version >= 1.4.2 (version recommanded : 1.5). See java.sun.com.
Error 306 : Unable to sign / Error while loading certificates (Mozilla only)
This may appear in Mozilla if your browser could not verify on-line the validity of a certificate. You may circumvent this problem by disabling the on-line verification of certificate :
- Go in menu "Tools > Options... > Advanced" (Or "Edit > Preferences > Advanced" in old versions).
- Click on tab "Security", and next on "Verification".
- Disable the OCSP verification, and click OK.
Error 420 : The JSS library is not correctly installed. (Mozilla only)
No working JSS library could be found. This JSS library is required to create a signature in Mozilla/Firefox browsers. It needs to be manually installed. Installation instructions can be found here. After the installation, you need to restart the browser.
Error 421 : Cannot sign as the JSS library is not correctly installed. (Mozilla only)
See Error 420
Error 501 : The CAPICOM library is not properly installed, aborting. (IE only)
The CAPICOM library was not found. Make sure that a file named capicom.dll is present in your Windows system directory (usually C:\Window\System32\ or C:\Winnt\System32). This library should have been automatically installed, provided that you authorized the installation, see section 3.1.
- Go in menu "Tools > Internet Options...", tab "Security"
- Click on "Trusted Sites", button "Sites..."
- Type in the text box "*.minfin.fgov.be", and click on "Add" to add the site to the list of trusted sites. See screenshot below.
- Click on "OK", and next on "Ok".
Error 502 : The certificate store does not contain any certificate. (IE only)
You do not have any certificate installed in your browser, or no certificate is suitable for signing a document. Make sure you successfully imported your digital certificate in the browser, see http://readers.eid.belgium.be/ for informations about how to import a certificate into Internet Explorer.
Error 503 : Failed to access the keys of the selected certificate. Permission was probably denied. (IE only)
This is a permission issue. The current user does not have sufficient permissions to access the key of your certificates. These keys are stored in "Key containers" for which you should have access. The steps to resolve this problem depend on the version of Windows you are using :
Windows NT :
The permission of the key container are specified in the registry. To change these permissions, open regedt32 (not regedit!), open the hive HKEY_LOCAL_MACHINE and highlight the key HKEY_LOCAL_MACHINE\Software\Microsoft\Cryptography\MachineKeys\<container name>. Select Security/Permissions from the menu and make sure Everyone has Full Control over this key.
Windows 2000 and Windows XP :
In Windows Explorer, locate the C:\Documents and settings\<username>\Application Data\Microsoft\Crypto\RSA\ directory. Change the access rights on this directory and all the files it contains by performing the following steps :
- Right-click on the C:\Documents and settings\<username>\Application Data\Microsoft\Crypto\RSA\ directory.
- Point to Properties
- Click Security tab.
- Make sure that You, the Administrator and the System have full control over this directory (check that all Allow boxes are checked).
- Click Advanced.
- Select the two check boxes (Inherit... and Replace...) on the bottom to enable the propagation of these access rights to all sub-directories and files.
- Click Apply, then Yes, and OK.
- Click OK.
You may have to reproduce these steps for the C:\Documents and settings\All Users\Application Data\Microsoft\Crypto\RSA\ directory
Note These are hidden files. In order to view these hidden files you must turn on the Display hidden files and folders option in Windows. To display hidden files and folders, perform the following steps:
- Click Start, point to Settings, and then click Control Panel.
- If you are in Category View : click Appearance and Themes
- Click Folder Options.
- On the View tab, under Hidden files and folders, click Show hidden files and folders.
Error 504 : Failed to access the keys of the selected certificate. Permission was probably denied. (IE only)
See Error 503.
Error 505 : Failed to access the keys of the selected certificate. Probable conflict between some of your certificates. (IE only)
There exists two possible causes : either you are using an old eID middleware, or there is a conflict between some of your certificates.
First, check the version of your Belgium eID Run-time. You may lauch the belgium eID utility program, usually located at "C:\Program Files\Belgium Identity Card\beidgui.exe". The version is shown in the "info" tab, it should be 2.5.9 (or higher). Please consider upgrading to the latest version available. This can be donwloaded from the eid belgium website at http://eid.belgium.be.
If this does not solve the problem, then the problem most probably lies in some conflict between the certificates that are registered by the eID middleware. This problem can be solved by manually deleting certificates.
To delete a certificate on Windows 2000 or Windows XP:
- Click Start and select Run.
- Type mmc and press ENTER.
- On the File menu, select Add/Remove Snap-In.
- Click Add.
- Double-click Certificates.
- Select My user account.
- Click Finish.
- Click Close and then OK.
- Double-click Certificates - current user.
- Double-click Personal and then Certificates.
- Click the certificate to delete.
- Press DELETE and click Yes.
- Close the Console1 window.
Your eID certificates will be re-registered automatically when you insert your eID card. If you had a class 3 certificate, then you will have to re-register it.
Error 506 : Failed make the signature. You card is maybe not present or not correctly inserted. (IE only)
Internet explorer is unable to access the certificates because your card is either not detected or not present. This error appears for instance when you want to make a signature but you removed the eID card after the authentication.Error 507 : Failed make the signature. You card is maybe not present or not correctly inserted. (IE only)
Internet explorer is unable to access the certificates because your card is either not detected or not present. This error appears for instance when the eID card is ejected just before validating the PIN code.Error 508 : Failed to make the signature. The browser seems to be confused. You probably need to restart it. (IE only)
Internet explorer is confused and cannot access your certificates. This error usually appears after other errors like the ones described above. You probably need to restart Internet Explorer.Error 509 : Failed to make the signature. The certificate could not be found. (IE only)
This error appears when Internet Explorer cannot find the certificate selected. This error appears with Isabel certificates. This error is cause by a faulty update of the Isabel certificates by Isabel Office Sign. A solution is available on the Isabel on-line support (www.isabel.be), section "Isabel Web Support", under document ID 48700 (make a search using this ID). If this does not solve the problem, contact the Isabel Helpdesk.
Error 510 : An error occurred during the signature process (IE only)
The CAPICOM library failed to create the digital signature. Depending on the actual error, one or more of the following actions may help in solving this problem :
- If you are using an eID card, install the latest version of the eID Middleware.
- Re-install the CAPICOM library. You can simply delete the capicom.dll file in your Windows System directory (e.g. C:\Windows\System32), and next perform the installation procedure (see above).
- Re-import your certificate, as it might be corrupted.